
EmailSentry™ Troubleshooting
(Re)Configuration Fails
The Add-in is configured or reconfigured by "Send"ing a message to CODE@Config.EmailSentry.com. This tells the Add-in to fetch your Fixed Config File. It is not supposed to send an email.
If it does send an email instead, likely resulting in a bounce message from CheckTLS, then the Add-in is not working. See the next steps to fix the problem.
Check that the Add-in is Installed
- Open Outlook
- Start a new email
- Enter any address in the To: field (e.g. test@checktls.com)
-
Enter "version.version.version" (no quotes, no caps, two dots) in the Subject: field
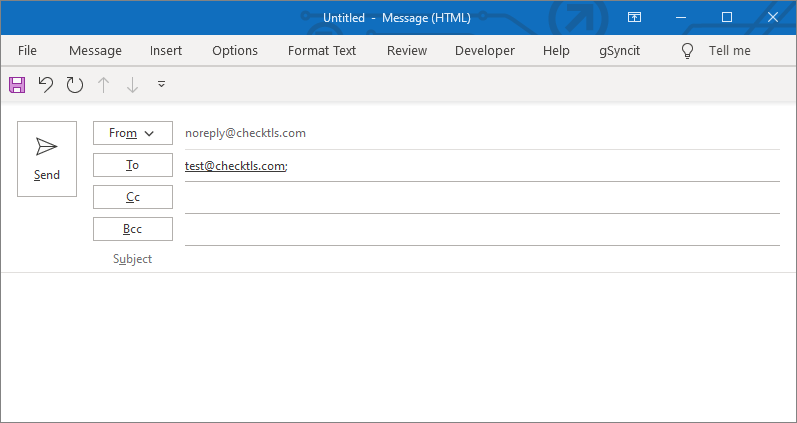
(click to enlarge) - Click Send
-
A small window should popup with the version of the Add-in installed on your PC

-
If the window does not popup and the email sends instead, you have not installed the Add-in correctly
You can try the Installation LINK again, and be sure you answer all the questions such that the installation proceeds
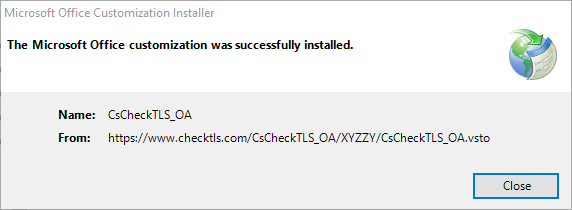
A successful installation results in this screen:
Check that the Add-in is Enabled
- Open Outlook
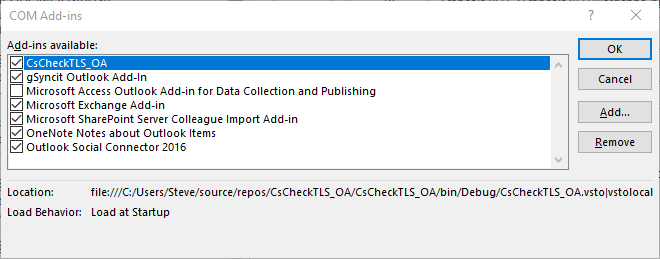
- Navigate to COM Add-Ins, either by
- Choosing COM Add-Ins from the Developer menu, or
- entering COM in the "Tell me what you want to do" box at the top of your screen and then choosing COM Add-ins in the pull-down, or
- under the File menu, choose Options in the left pane, then Add-ins in the left pane, then Manage: COM Add-ins and Go... at the bottom of the right pane
- If EmailSentry is not listed, then use your normal installation process to install it.
- If EmailSentry is listed but not checked, check the checkbox and click OK.
- Select COM Add-Ins again and make sure the checkbox is still checked — if not, see the next step.
- Close and re-open Outlook
Enabling a Disabled Add-in
- Open Outlook
- Navigate to Disabled COM Add-Ins by (same steps as above but choose Disabled COM Add-Ins)
- Highlight the EmailSentry line and then click Enable
- Close and re-open Outlook
Preventing the Add-in From Timing-Out
The ClickOnce version of EmailSentry uses .NET. Microsoft admits that it's own .NET startup can be so slow as to cause Outlook to disable the add-in because it took too long to initialize. (See first bullet on Support for keeping add-ins enabled.) EmailSentry does nothing on startup except register itself: one single system call.
We provide two scripts that add the Microsoft recommended registry settings to allow the Add-in to operate correctly.
- registry
- Enable_AddIn.reg
- powershell
- Enable_AddIn.ps1
Download one of these and run it from the command line because scripts like these cannot be run directly from the Internet. To do this:
- Right click one of the links
- Choose "Save link as..."
- Click "Downloads" in the list of folders on the left
- Click "Save" button (lower right)
- Click Enable_AddIn.reg at the bottom of the screen
- Navigate through any security questions to run the script
Note the .msi installation of EmailSentry is able to add the proper registry entries to work around this problem.
Removing a Stubborn Add-in
- Open Outlook
- Navigate to COM Add-Ins, either by
- entering COM in the "Tell me what you want to do" box at the top of your screen and then choosing COM Add-ins in the pull-down, or
- under the File menu, choose Options in the left pane, then Add-ins in the left pane, then Manage: COM Add-ins and Go... at the bottom of the right pane
- Highlight the EmailSentry line and then click Remove
- Close and re-open Outlook
- See if the problem is fixed, if not continue with
- Close Outlook
- Use Windows Add/Remove Programs to uninstall EmailSentry
- Open Outlook
- See if the problem is fixed, if not continue with the next section
Unable to install this application because an application with the same identity is already installed.
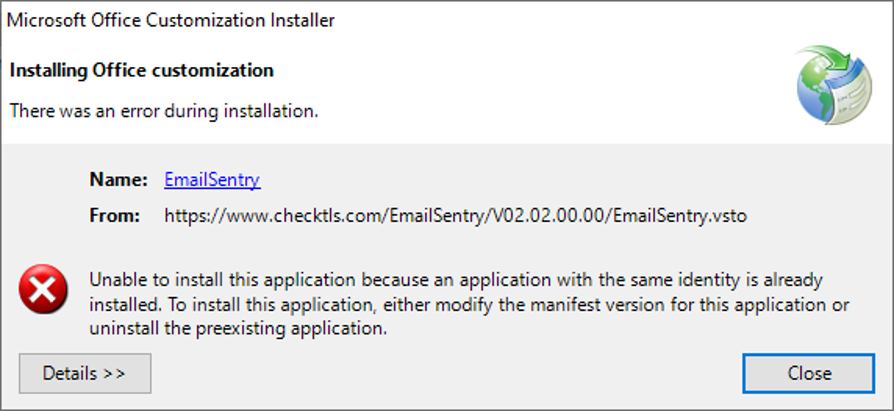
(click to enlarge)
This is the result of a previous failed install or uninstall.
These steps will remove traces of the previous install:
- Close Outlook
- Press Start+R. In the Run command prompt type cmd and press enter
- from the C: prompt type
rundll32 dfshim CleanOnlineAppCacheand press Enter - from the C: prompt type
exitand press Enter
- Press Start+R. In the Run command prompt type cmd and press enter
- from the C: prompt type
rmdir /S %LOCALAPPDATA%\Apps\2.0(if it asks "Are you Sure?" answer yes) - from the C: prompt type
rundll32 dfshim CleanOnlineAppCache(run it a second time) and press Enter - from the C: prompt type
exitand press Enter
If you have other Outlook ClickOnce Add-ins, you will have to browse into %LOCALAPPDATA%\Apps\2.0 to find their obfuscated directories, and delete all but those.
Another option is to use Control Panel ==> Programs ==> Uninstall a program.
...cannot be installed because another version is currently installed...
This can be the result of left over registry entries from a previous Add-in install. Microsoft says this should not happen, but... These steps delete the hanging entries:
- Close Outlook
- Press Start+R. In the Run command prompt type regedit and press enter
- Navigate to HKEY_CURRENT_USER\Software\Microsoft\VSTA\Solutions
- Open each of the {GUID}s and look for the one with a DWORD "Url" with CheckTLS in it
- Delete the entire {GUID}
- See if the problem is fixed, if not continue with
- Navigate to HKEY_CURRENT_USER\Software\Microsoft\VSTO\SolutionMetadata
- Delete the entry named "https://www.checktls.com..."
If All Else Fails
- Use Windows Add/Remove Programs to repair Outlook
- Close Outlook
- open Windows Add/Remove Programs
- if you have a Microsoft Office 365 entry, click it
- Click Modify
- Choose Quick Repair
- if you have an Office entry, click it
- Click Advanced Options
- Click the Repair button (under Reset heading)