
Embed API
Embed lets you put our tests on your own web pages. This is different than CheckTLS web service (API), which lets your data processing systems use our services. Embed lets your users interact with our tests on your web site or intranet. Web services lets your computers interact with our tests with no user involvement.
Embed requires a Corporate Subscription, however it is available for testing and proof-of-concept without a subscription. Without a subscription testing is limited to the single address "test@checkts.com".
Make CheckTLS (Receiver) Test Your Own
This document describes how to put our most popular test () on your own web pages.
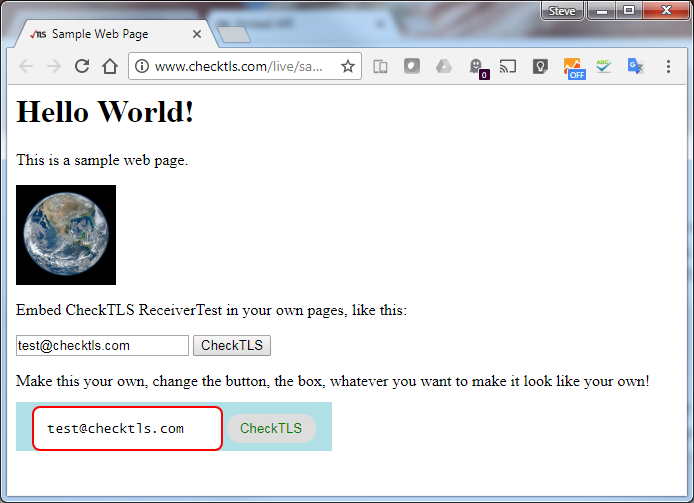
In a similar manner, you can make any CheckTLS web service enabled test look like it is your own test, and put it on your own web pages:
Click the image below to open an example in a new tab.
Notice there are no headings, titles, or anything else that ties this back to CheckTLS.
You can right click on that page to see the HTML source code used to create it.
What is Embed?
Embed is combination of a CheckTLS web service (API) and some HTML code that you add to your web page(s). It is not run by a person from their browser. Instead, as your users interact with your web page, your web page asks CheckTLS to run the test and send the results back. Your page takes the results and formats them as your own.
What Embed Does
Your user sees an input box on a Request page of your web site and a CheckTLS button. When they enter something and click the button, they get a new page (Response) on your web site with their answer. They never see a CheckTLS page.
Behind the scenes, when the user submits the form on your Request page, their browser calls our Embed web service front-end. Embed runs the test you specified with the input from the user. It parses the output and picks out the result fields you specified. Finally it instructs the user's browser to "submit" the selected results back to your Response page. Your Response page uses JavaScript to load the results into a new page for the user.
How To Use Embed
Embed has three parts:
- Request
- A web page on your site where your users fill in data they want you to test for them.
- Embed
- The front-end to our web services that your Request page calls to run the test and return the results to you.
- Response
- A web page on your site where you display our results to your users.
When your user submits the form on your Request page, their browser calls Embed. Embed runs the test you specify and directs the user's browser to your Response page.
Request
The Request is a web page on your site.
You completely control the content and look and feel of this page.
The page must have the HTML <form> element below:
<head>
  <meta name="viewport" content="width=device-width, initial-scale=1" />
</head>
<body>

<form method="post" action="https://www.checktls.com/Embed">
  <input name="AUTH" type="hidden" value="
lm3KVY+FI3TGdolb1mLkapuUohBNcI0A9Bxqu4/DY2xXMyoXFm5R1aEMhVtUAPpG6nXIOAknnARu
hdB6kbQuOEBGpMOS2seoobs8GQvnx9CATVo+EPpdUNVdnLobRPuxv5EPFXzRGgu7YywlHCUuzhnr
xpsylQ+GC572a8/2lpugmeiC5NCyzbh4Wev7+sRHXZ3R9HLelAQtk8gGQTdwl3FFwrTrV4tZh5us
GZjFOh+osUIh4KrB4Sv7P6/jNgUGEbNQ7NEBGPuisdEPtahgLKE1xJsuUzQjFdGl7F2H/KwdbAbX
0zPm9RHTSq0/G/4DTqhdAwtM29We36AnZ1fHKw==
" />
  <input name="CHECKTLS_URL" type="hidden" value="/TestReceiver" />
  <input name="a_EMAIL" type="text" value="test@checktls.com" />
  <input name="a_LEVEL" type="hidden" value="XML_DETAIL" />
  <input name="XF" type="hidden" value="eMailAddress:ConfidenceFactor:/CheckTLS/MX/@exchange" />
  <input name="RETURN_URL" type="hidden" value="https://www.checktls.com/embed_response.html" />
  <button name="ACTION" type="submit" value="CheckTLS">Check It</button>
</form>

</body>
Without your look and feel, the above form looks like:
You use the <input> lines to tell Embed what to do. The <form> and <button> lines have to be exactly as shown above. Most of the <input>s (in this example all but one) are hidden. You use them to specify the test on our site you want to run, some of the parameters for that test, and what parts of the test results you want us to send back to you.
The <input> lines are:
- AUTH
-
A custom authorization code that we generate for you.
Click here to get yours.
It keeps someone from stealing your COMPANYCODE and COMPANYPASS by viewing your HTML source code.
If you omit this input you can still test any checktls.com address:
<input name="a_EMAIL" type="text" value="test@checktls.com" /> - CHECKTLS_URL
- The URL of our test you want to run for the user. It must be web service enabled and must return XML. See the documentation on the test you want to run for information on how to make it output XML.
- a_XXXXXX
-
These are parameters for the test you want to run.
Each "a_" input is a parameter from the specific web service test on our site.
For example the above <form> runs with:
EMAIL=test@checktls.com LEVEL=XML_DETAIL - XF
- XPath path expressions to select the XML nodes whose data you want to extract from the test output. Separate multiple expressions with a colon (":"). For example, the above <form> returns the Target, Confidence Factor℠, and MX Hosts (which could be an array if there is more than one DNS MX record).
- RETURN_URL
- The URL of your Response page, which is how we direct the user back to you.
Response
The web page on your site where you display our results to your users.
Your Response page must have this JavaScript, and something like the HTML below it:
<head>
  <meta name="viewport" content="width=device-width, initial-scale=1" />
</head>
<body>

<script type="text/javascript">
function getQueryParams(qs) {
	qs = qs.split('+').join(' ');
	var params = {}, tokens, re = /[?&]?([^=]+)=([^&]*)/g;
	while (tokens = re.exec(qs)) {
		params[decodeURIComponent(tokens[1])] = decodeURIComponent(tokens[2]);
	}
	return params;
}
var query = getQueryParams(document.location.search);
window.history.replaceState( null, null, document.location.origin+document.location.pathname );
</script>

<p>
Address <script>document.write(query.eMailAddress);</script>:
<script>
	if( query.ConfidenceFactor >= 90 ) {
		document.write( '<b>Yes!</b>  This recipient uses TLS.' );
	} else {
		document.write( '<b>No!</b>  This recipient does not use TLS.' );
	}
</script>
(score:<script>document.write(query.ConfidenceFactor);</script>)
</p>

</body>
Without your look and feel, the above output looks like:
Address test@checktls.com: Yes! This recipient uses TLS (score:100)
When your user submits the form on your Request page, their browser calls Embed. Embed runs the CHECKTLS_URL using the a_XXXXXX parameters, parses the output, which must be XML, and picks out the nodes you specify in XF. Then it instructs the user's browser to "submit" the selected data back to your Response page where the JavaScript makes it available to you.
About the JavaScript
The JavaScript for your Response page reads the XF field names and values from Embed and makes them available as checktls.[fieldname]. You do have to access these from JavaScript as in the example above.
Embed Examples
Click HERE to open a working example of a Request page. If you click the button on that page to run the test, the result page is a working example of a Response page. This is the exact source code as displayed above.
Development and Debugging
These steps build a fully functional Embed on your site. The Embed calls our on a target that you enter. It uses Request and Response web pages on your site. Once you have this simple Embed of our ("TestReceiver") test it should be easy to extend it to any CheckTLS WebService. Following these steps:
-
create the Request page on your site
This makes a Request web page that can reach CheckTLS, open the Embed page on our site, and fill in the parameters. -
show the WebService (as a URL)
This shows the WebService that your Embed will execute on our site. The WebService is formatted as a URL so you can both see it and copy/paste it for debugging. -
call the WebService
This shows that you can call the WebService and get back the result XML. -
show the return URL internally
This shows what the return call back to your Response web page looks like. -
show the return URL externally
This shows that all the steps from your Request page to this point work. -
try our return URL manually
This shows that the return URL works to open a page on our site. -
try our return URL internally
This shows that Embed can call the return URL. -
try our return URL externally
This shows that all the steps from your Request page to this point work. -
create a Response Page on Your Site
This makes a Response web page that CheckTLS can reach and return data to. -
try your return URL internally
This makes sure CheckTLS can call your Response page. -
try your return URL externally
This shows that all the steps from your Request page to this point work. -
add authentication
Generate and add an AUTH parameter. -
test everything but your AUTH parameter
This makes sure no errors were introduced in your AUTH changes. -
test your AUTH parameter
This makes sure your AUTH, and the whole Embed project, works.
Create the Request Page on Your Site
Put this exact HTML on a Request webpage on your site:<head>
<meta name="viewport" content="width=device-width, initial-scale=1" />
</head>
<body>
<form method="post" action="https://www.checktls.com/Embed">
<input name="AUTH" type="hidden" value="
lm3KVY+FI3TGdolb1mLkapuUohBNcI0A9Bxqu4/DY2xXMyoXFm5R1aEMhVtUAPpG6nXIOAknnARu
hdB6kbQuOEBGpMOS2seoobs8GQvnx9CATVo+EPpdUNVdnLobRPuxv5EPFXzRGgu7YywlHCUuzhnr
xpsylQ+GC572a8/2lpugmeiC5NCyzbh4Wev7+sRHXZ3R9HLelAQtk8gGQTdwl3FFwrTrV4tZh5us
GZjFOh+osUIh4KrB4Sv7P6/jNgUGEbNQ7NEBGPuisdEPtahgLKE1xJsuUzQjFdGl7F2H/KwdbAbX
0zPm9RHTSq0/G/4DTqhdAwtM29We36AnZ1fHKw==
" />
<input name="CHECKTLS_URL" type="hidden" value="/TestReceiver" />
<input name="a_EMAIL" type="text" value="test@checktls.com" readonly="readonly" />
<input name="a_LEVEL" type="hidden" value="XML_DETAIL" />
<input name="XF" type="hidden" value="eMailAddress:ConfidenceFactor:/CheckTLS/MX/@exchange" />
<input name="RETURN_URL" type="hidden" value="https://www.checktls.com/embed_response.html" />
<button name="ACTION" type="submit" value="ShowEntries">Show Entries</button>
<button name="ACTION" type="submit" value="ShowSource">Show Source</button>
<button name="ACTION" type="submit" value="ShowTest">Show Test</button>
<button name="ACTION" type="submit" value="RunTest">Run Test</button>
<button name="ACTION" type="submit" value="ShowResult">Show Result</button>
<button name="ACTION" type="submit" value="ShowRedirect">Show Redirect</button>
<button name="ACTION" type="submit" value="CheckTLS">Run It</button>
</form>
</body>
Browse to the Request page on your site and click on the Show Entries button.
You should be taken to the Embed page with all the fields filled in like this:

If you are not taken to the Embed page or the page does not look exactly as pictured above, then either your Request page HTML is wrong, your webserver is not "serving" the HTML correctly, or your browser will not allow a cross-domain post (which should give you an error message). You can use the Contact Us form to send us the URL of the page with the Request HTML and we may be able to help.
Show the WebService (as a URL)
Make sure you are running the test you think you are running with the parameters you think you are supplying. From the Embed page you just got (not from the Request page on your site), click the Show Test URL button. Embed will display the URL that your entries will execute. Examine the URL to be sure it is doing what you expect.
Call the WebService
From the same Embed page, use the Show Result button to run this URL, which calls the WebService.
It will open a new window with the Result XML.
If you do not get the correct result XML then you have an error in the CheckTLS_URL or ARGS fields.
Close this window.
Show the Return URL Internally
From the first Embed page, use the the Show Redirect button to display the URL we will use to launch your Response page. Embed will call the WebService, parse the result, and build a link back to your site. This Response URL is visible at the bottom of the page. If you do not get the proper URL, then the HTML you entered on your Request webpage is not correct.
Show the Return URL Externally
Browse to the Request page on your site and click on the Show Redirect button. You should be taken to the same page as the Internal test immediately above with the exact same fields and URLs.
Note the Referrer IP given just above the URLs in the Test Results section.
This IP must be in the range you provide when creating your AUTH.
Close this window.
Try Our Return URL Manually
From the Show Redirect (Show the Return URL) Embed page, copy and paste the entire machine readable URL into a new window of your browser.
You should be taken to the Response page on our web site:

Close this window.
Try Our Return URL Internally
From the same Show Redirect (Show the Return URL) window you copied the URL from, click the Run It button.
A new window should open with the same Response page on our site.
Close this window.
Try Our Return URL Externally
Browse to the Request page on your site and click the Run It button.
You should be taken to the same Response page on our site as the two Try Our Return URL pages just above.
Close this window.
Create a Response Page on Your Site
Put this exact HTML on a new Response webpage on your site:
<head>
  <meta name="viewport" content="width=device-width, initial-scale=1" />
</head>
<body>

<script type="text/javascript">
function getQueryParams(qs) {
	qs = qs.split('+').join(' ');
	var params = {}, tokens, re = /[?&]?([^=]+)=([^&]*)/g;
	while (tokens = re.exec(qs)) {
		params[decodeURIComponent(tokens[1])] = decodeURIComponent(tokens[2]);
	}
	return params;
}
var query = getQueryParams(document.location.search);
window.history.replaceState( null, null, document.location.origin+document.location.pathname );
</script>

<p>
Address <script>document.write(query.eMailAddress);</script>:
<script>
	if( query.ConfidenceFactor >= 90 ) {
		document.write( '<b>Yes!</b>  This recipient uses TLS.' );
	} else {
		document.write( '<b>No!</b>  This recipient does not use TLS.' );
	}
</script>
(score:<script>document.write(query.ConfidenceFactor);</script>)
</p>

</body>
From the same Show Redirect (Show the Return URL) window, change the Return_URL field to be the URL of this Response page on your site.
Click on the Show Redirect button.
Embed will display the new redirect URL in human and machine readable formats.
Copy and paste the entire machine readable URL into a new window of your browser.
You should be taken to the Response page on your web site that looks just like the image above from our site.
If you do not get your Response page then your Response page has an error.
Close this window.
Try Your Return URL Internally
From the same Show Redirect (Show the Return URL) window you copied the URL from, click on the Run It button.
A new window should open with the same Response page from your site.
If it does not, contact us and let us know.
Close this window.
Try Your Return URL Externally
Browse to the Request page on your site and click the Run It button.
You should be taken to the same Response page from your site.
Close this window.
Add Authentication
The most common problems when using Embed are with the AUTH parameter. All of the above steps target "test@checktls.com", which we allow with any AUTH, or even no AUTH. Once you have it working with the target "test@checktls.com", then generate a valid AUTH using your IP range and account.
Test Everything But Your AUTH Parameter
Paste this AUTH in place of the AUTH lines in the HTML on your Request page. Remove the readonly="yes" element from the a_EMAIL field (third line after the end of the AUTH string).
Browse to the Request page on your site, leave the target as "test@checktls.com", and click the Run It button. You should be taken to the same Response page from your site. This shows that there are no errors outside the AUTH.
Test Your AUTH Parameter
Browse back to the Request page on your site, change the target to something else, and click the Run It button. You should be taken to your Response page with the results of the new target. If not, your AUTH parameter is either wrong or was pasted into the HML incorrectly.
Next Steps
The above simple Request/Response web pages run our on a target that your users enter. Your web designer(s) can embed (thus the name!) the HTML into real pages on your site, so our test has your look and feel. How to do that is not something we can help with.
The above simple Request/Response retrieves one bit of information (the Confidence Factor℠) about the target. You can retrieve any information from 's output, not just the Confidence Factor℠. See the info on XF in Request above.
For example you could let your users know if an address supports TLS 1.3 by returning the TLS version of the first MX. Use XF=/CheckTLS/MX[1]/SSL/SSLVersion and compare it to "TLSv1_3".
You can embed other CheckTLS tests in your site.